Discover the quick and easy way to protect your Google Sheets. We’ll walk you through the simple steps to how to lock a sheet in google sheets. Once you’ve learned these techniques, you’ll be able to lock your Google Sheets within a minute.
Table of Contents

Why locking is important?
When it comes to Google Sheets, data security and preventing others from editing or removing it is a very important issue. The locking and protecting feature in Google Sheets provide a solution to all these problems.
Using this feature, you can protect and lock Google Sheets tabs. You can also give access to a specific person to edit your sheet or not.
If you want to lock a specific range within Google Sheets, it is also possible with the help of protected range functions. You can protect a specific cell range. There are many such possibilities and advantages of Google Sheet locking.
How to Lock a Sheet in Google Sheets
If you need to lock a sheet, it’s quite simple:
First, you need to select the sheet you want to lock or protect.
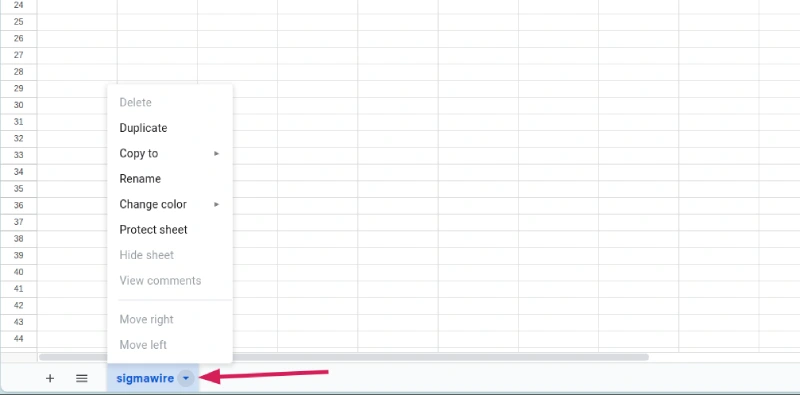
Then, right-click on the name of the sheet. An options menu will open. You can also do this in another way. There is a down arrow next to your sheet. If you click on it, the options menu will open.

Then you need to select “Protect sheet“. Once you click, all the options for protecting will appear on the top right side, as shown in the image below.

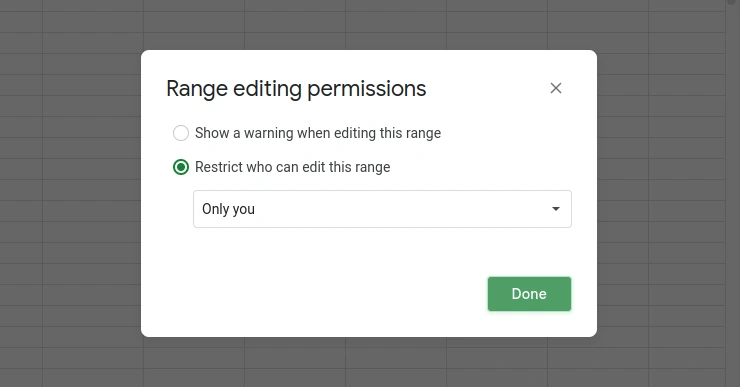
Now you need to click on “Set permissions“. A pop-up window will open asking who you want to restrict from editing. By default, it is selected to “Only you“. As you can see in the image below.

“Only you” means that only you can edit that sheet and other shared members of the sheet cannot edit that sheet.
If you want to share edit access to the sheet with a specific person, you need to select “Custom” instead of “Only you” from the dropdown option. Then a list of emails of all shared members will be shown. Whoever you tick mark will get edit access to that sheet.
Finally, the process is complete. Just click the “Done” button after doing everything and your sheet will be protected.
How to Lock Cells in a Google Sheet
Protecting cells in Google Sheets is very important to keep your data safe. This ensures that no unauthorized person can edit or delete your data. It is also a good way to prevent accidental changes to important information.
Here are the steps on how to lock cells in Google Sheets:
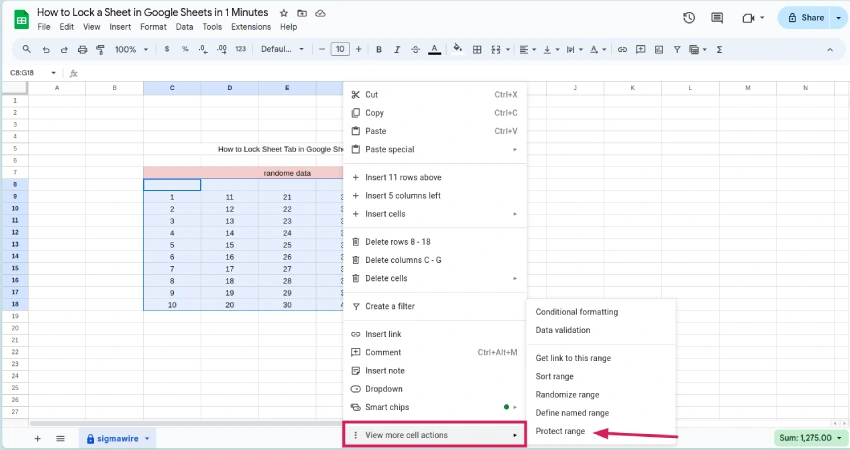
Select the range of cells you want to protect. You can do this by clicking and dragging your mouse over the cells, or by using the keyboard shortcuts Ctrl+A (to select all cells on the sheet) or Ctrl+Shift+Space (to select the entire current region).
Right-click on the selected range of cells.

Alternatively, you can access this feature by first going to the “Data” option in the top menu bar and selecting “Protect sheets and ranges“.
Select “Protect range” from the menu that appears.

In the “Protect range” box, enter the range of cells you want to protect. The range should be in the format [sheetname!firstcell:lastcell], for example, Sheet1!A1:B10.

Click the “Set permissions” button.
In the “Set permissions” window, select who you want to allow to edit the protected range.
“Only you” means that only you will be able to edit the protected range.
“Custom” allows you to select specific people or groups of people who will be able to edit the protected range.
Click the “Done” button.
Your cells are now protected! Anyone who tries to edit them will see a message saying that the cells are protected.
Read more about what is a slicer in google sheets.
Here are some additional tips:
- If you want to protect multiple ranges of cells at once, you can select them all before you start the process of protecting cells.
- If you want to lock an entire sheet, you can right-click on the sheet name and select “Protect sheet.”
- want to learn more about locking visit google official page at https://support.google.com/docs/answer/1218656
FAQs
Can I lock specific parts of a formula?
Yes, you can use dollar signs ($) to lock specific cell references within a formula. This prevents those references from changing when the formula is copied or dragged.
How do I unlock cells?

Go to the Data option, navigate to Protect Sheets and Ranges. Then, choose the protection you desire. Once selected, a delete button will appear enabled at the top right corner. Simply click on it to proceed.
What happens when someone tries to edit a locked cell?
They will see a message indicating that the cell is protected and cannot be edited.
