Rust is a modern programming language that revolutionizes system-level programming with its emphasis on safety, speed, and concurrency. Developed by Mozilla Research, Rust offers the performance and control akin to C and C++, but distinguishes itself with features that ensure memory safety and thread safety, effectively eliminating a wide class of bugs at compile-time. Its powerful type system and ownership model enforce strict rules for memory management, enabling developers to build reliable and efficient software without the overhead of a runtime or garbage collector.
Rust’s productivity tools, such as integrated package management and multi-editor support, further enhance the developer experience, making it a beloved choice for creating everything from command-line interfaces to network services and web applications. Rust’s rise as a “most-loved” language is a testament to its modern approach to solving traditional problems in software development.
Core Concepts of Rust: Safety, Concurrency, and Speed
Rust’s design is a become of modern programming, prioritizing the core concepts of safety, concurrency, and speed. Its commitment to safety is unparalleled, with a borrowing and ownership system that ensures memory safety without the need for a garbage collector.
Concurrency is another area where Rust shines, offering fearless concurrency through its ownership and type systems, which turn potential runtime concurrency errors into compile-time errors.
This means developers can write concurrent code that is not only safe but also efficient, as Rust’s performance rivals that of C and C++. The language’s zero-cost abstractions allow for high-speed performance without sacrificing safety, making Rust a standout choice for developers who need to manage low-level details while still enjoying high-level conveniences.
Setting Up Your Environment: Installing Rust
Setting up your environment for Rust development is a straightforward process that will equip you with the tools needed to start coding in Rust.
Here’s a step-by-step guide to get you up and running:
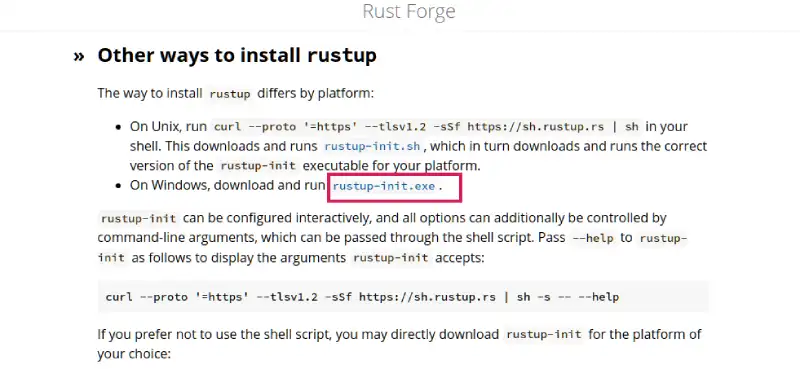
1. Download Rustup: Begin by downloading rustup, the Rust toolchain installer. Visit the official Rust website and choose the appropriate rustup-init.exe for your system.
2. Install Rust: Run the downloaded rustup-init.exe file and follow the on-screen instructions. This will install both rustup and the latest stable version of Rust.

3. Install Build Tools: If you’re on Windows, you may need to install the Visual Studio C++ Build tools when prompted. This is essential for compiling Rust programs.
4. Configure PATH: After installation, rustup will attempt to configure the PATH environment variable automatically. This is to ensure that the Rust tools are available in your command line.
5. Verify Installation: To confirm that Rust is installed correctly, open a new terminal window and type rustc –version. You should see the version number of the Rust compiler.
6. Update Rust: If you’ve installed Rust before, you can update your installation to the latest version by running rustup update in your terminal.
7. Uninstall Rust: If you ever need to uninstall Rust, you can run rustup self uninstall from your terminal.
By following these steps, you’ll have a Rust development environment ready for creating robust and efficient applications.
Understanding the Basics Rust Servers
Understanding the basics of Rust servers is essential for developers looking to leverage Rust’s performance and safety for web services.
Here’s a step-by-step breakdown:
Grasp the Protocols: Familiarize yourself with TCP and HTTP, the foundational protocols for web servers. Rust servers operate on these protocols to manage data transmission and web content delivery.
Install Rust: Ensure you have the Rust programming language installed. Use rustup, the official Rust toolchain manager, to install and update Rust on your system.
Create a Project: Start a new Rust project using Cargo, Rust’s package manager and build system. This will set up the basic structure for your server application.
Listen for Connections: Use Rust’s std::net::TcpListener to bind to a port and listen for incoming TCP connections. This is the first step in establishing communication between your server and clients.
Handle Requests: Once a connection is established, your server will need to handle requests. This involves parsing HTTP requests and generating appropriate responses.
Send Responses: Develop the logic to send back responses to the client. This could be HTML content, JSON data, or any other format your service provides.
Multithreading: To handle multiple requests efficiently, consider implementing a multithreaded server using Rust’s concurrency features. This will allow your server to manage several connections simultaneously without blocking.
Testing: Rigorously test your server to ensure it can handle various scenarios, including high traffic, invalid requests, and server errors.
Deployment: Once tested, deploy your server to a suitable hosting environment that supports Rust applications.
Maintenance: Regularly update and maintain your server, applying security patches and performance improvements as needed.
By following these steps, you’ll gain a solid understanding of Rust servers and be well on your way to building robust, efficient web services with Rust.
Step-by-Step Guide: Creating Your First Rust Server
Creating your first Rust server is an exciting journey into the world of online gaming. Here’s a step-by-step guide to get you started:
Prepare Your System: Ensure your system meets the minimum requirements for running a Rust server, which includes a suitable OS, processor, memory, and network capabilities.
Install SteamCMD: Download and install SteamCMD, the command-line version of the Steam client, which will help you install the necessary server files.
Download Server Files: Use SteamCMD to download the Rust server files to a specified directory on your system.
Configure the Server: Set up your server’s basic configuration, including the server name, description, port, map, and other preferences.
Launch the Server: Execute the server files to start your Rust server. You can do this via a command prompt or by running an executable file, depending on your setup.
Connect to Your Server: Test your server by connecting to it through Rust’s in-game console, using either your local IP address or ‘localhost’ followed by the server port.
Customize and Manage: Once your server is up, you can further customize it with plugins, mods, or adjust settings to suit your preferences.
Maintain Your Server: Regularly update your server and monitor its performance to ensure a smooth gaming experience for all players.
By following these steps, you’ll have laid the foundation for your very own Rust server, ready to host epic survival adventures for you and your friends.
What is the Cheapest Rust server Hosting?
Scalacube provides affordable Rust Server Hosting options.
Our services can include features such as automated backups, support for mod installations, integrated web control panels, and more, depending on the provider.
However, since these solutions depend on shared resources, they may not always be ideal for intensive gaming applications, as performance can be impacted by traffic spikes from other sites using the same infrastructure.
Customizing Your Rust Server: Configuration Tips
Customizing your Rust server is a pivotal step in tailoring the gaming experience to your preferences.
Here are some essential configuration tips to enhance your server:
Set a Strong RCON Password: Begin by securing your server with a robust RCON password to prevent unauthorized access.
Adjust Server Settings: Modify basic settings like server name, description, and maximum player count to reflect the nature of your server.
Map Configuration: Choose the right map size and type for your community. Consider custom maps for a unique experience.
Control the Environment: Set parameters for day length, night length, and weather patterns to create the desired atmosphere.
Manage Resources: Fine-tune resource spawn rates and loot tables to balance the survival aspect of the game.
Customize Player Interactions: Configure player versus player (PvP) and player versus environment (PvE) settings to match the level of challenge you want.
Implement Mods and Plugins: Enhance gameplay with mods and plugins, but ensure they are kept up-to-date and are compatible with your server version.
Regular Backups: Schedule regular backups of your server to prevent data loss and facilitate easy recovery from any issues.
Performance Optimization: Monitor server performance and adjust tick rates and other technical settings to ensure smooth gameplay.
Community Feedback: Listen to your players and make adjustments based on their feedback to improve the overall experience.
By following these tips, you can create a Rust server that stands out and provides an engaging and enjoyable environment for your players. Remember, the key to a successful server lies in the balance between challenge and fun.
Managing Server Resources: Optimization and Monitoring

In the context of Rust, managing server resources effectively is crucial for a seamless gaming experience. Optimization and monitoring involve a series of steps to ensure the server runs efficiently and without interruptions.
Server administrators must regularly monitor performance metrics such as tick rate, CPU usage, memory usage, and network latency to identify and address potential bottlenecks.
Adjusting server configurations, like entity batch sizes and garbage collection intervals, can significantly improve performance.
Moreover, employing tools like RustAdmin or Rust Server Manager can automate tasks and enhance server management features, contributing to overall server stability and performance.
Regular maintenance, including server restarts and updates, along with proactive monitoring using tools like Rust-Server-Metrics, ensures that the server remains optimized for the best possible gameplay.
By staying vigilant and responsive to the server’s needs, administrators can provide a smooth and enjoyable gaming environment for all players.
Security Measures: Keeping Your Rust Server Safe
Maintaining the security of your Rust server is paramount to providing a safe and enjoyable gaming environment. Implementing robust security measures is a multi-faceted approach that involves several key strategies.
Firstly, setting up firewalls is essential to block unauthorized access and protect against potential intrusions.
Secondly, utilizing Anti-DDoS tools is critical to safeguard your server from distributed denial-of-service attacks, which can cause significant disruptions and even server downtime.
Regularly updating server software and all associated plugins can prevent vulnerabilities from being exploited.
Additionally, enforcing strong password policies and enabling two-factor authentication (2FA) can greatly reduce the risk of unauthorized access.
It’s also advisable to educate your player community on best practices for security to create a first line of defense.
By staying vigilant and employing these security measures, server admins can ensure that their Rust servers remain secure against a wide array of cyber threats3.
Community Engagement: Growing Your Rust Server User Base
Growing your Rust server user base through community engagement is a dynamic process that hinges on creating a welcoming and interactive environment.
To foster a thriving community, it’s essential to engage players with regular events, challenges, and updates that keep the gameplay fresh and exciting.
Establishing a unique server identity and culture attracts like-minded players and promotes a sense of belonging. Utilizing social media and gaming forums can amplify your reach, drawing in new players and retaining existing ones.
Encouraging current members to invite friends and offering incentives for referrals can also expand your community organically.
Moreover, listening to player feedback and implementing changes demonstrates that you value their input, further solidifying their loyalty to your server.
By combining these strategies with a consistent presence and responsive communication, you can significantly grow your Rust server’s user base and create an engaging online haven for gamers.
Troubleshooting Common Issues in Rust Server Setup
Troubleshooting common issues during a Rust server setup is a critical skill for administrators aiming to provide a stable gaming environment. The process often begins with checking server logs for errors, which can reveal underlying problems and guide corrective actions.
Restarting the server can resolve temporary glitches and restore functionality. It’s also important to verify server files to ensure all components are intact and up-to-date.
Adjusting server configurations, such as the tick rate and entity spawn rates, can alleviate performance issues. Regular maintenance, including updates and backups, prevents many common issues from arising.
When more complex problems occur, consulting the Rust community forums and dedicated support channels can provide valuable insights and solutions.
By methodically addressing each issue and employing best practices in server management, administrators can maintain a Rust server that offers an optimal experience for all players.


