The blue screen of death might seem scary, but don’t worry, there’s hope! It can happen for many reasons, but luckily, a lot of them can be fixed. We’re here to help you sort out the blue screen and get your PC back in shape. Plus, we’ll tell you about a great tool that helps keep your computer running smooth.
Why Blue Screen of Death Error Occur?
When your Windows computer encounters a serious issue and crashes, you’re faced with a blue error screen. It’s an indicator that the operating system has stumbled upon a critical error and can’t continue to operate safely.
Although this screen may seem daunting, it’s often the result of less severe problems that can be addressed. Many of these issues are minor and can be corrected with some simple troubleshooting. So, while the blue screen might initially appear catastrophic, it’s usually just a temporary setback that can be resolved, allowing your computer to run smoothly again.
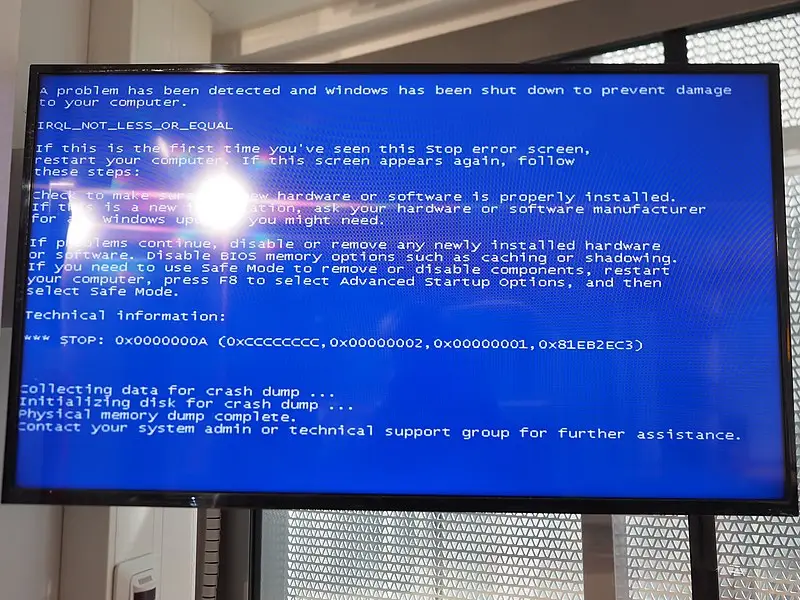
In Windows 10 and newer versions, when you see a blue screen, it tells you what went wrong and gives you a special code. You can use this code to look up more information on the Microsoft website. Sometimes, there’s even a QR code on the blue screen that you can scan with your phone to quickly find out more about the problem.
We’ll check out the usual causes of blue screen errors and explain what the most common error codes mean. If you’re in a rush, you can go right to our advice on how to fix the blue screen, no matter which error code appears.
How Do We Recognize the Blue Screen of Death and What Causes It?
The blue screen error often pops up when there’s a glitch that prevents Windows from operating securely. It might happen due to software issues like drivers that don’t get along with your system, or hardware troubles such as a hard drive that’s due for a format or a CPU that’s too hot because it’s been pushed beyond its limits.
The blue screen error typically stems from issues with hardware interactions or file corruption. However, you can pinpoint the exact problem using the error code provided by Windows. While most causes for the blue screen aren’t too worrisome if they’re one-offs, frequent crashes are a red flag. To sidestep the blue screen altogether, regular maintenance of your PC is key to ensuring it operates without a hitch.
When your PC starts to slow down, giving it a good clean-up can work wonders. Clearing out those unnecessary files and apps can give it a much-needed boost. There’s a tool called Avast Cleanup that’s made just for this job. It gets rid of clutter, sorts out disk errors, and makes sure your programs are up to date, all by itself.
Typical Error Codes in Windows System
Here’s a detailed explanation of the common Windows Stop Codes you’ve mentioned, along with the typical reasons they occur and general steps to resolve them:
CRITICAL_PROCESS_DIED This Stop Code indicates that a critical system process has terminated unexpectedly. It could be due to software conflicts or corrupted system files. To resolve this, you can:
- Perform a system file check (sfc /scannow in Command Prompt).
sfc /scannow- Check for system updates.
- Restore your system to an earlier point using System Restore.
SYSTEM_THREAD_EXCEPTION_NOT_HANDLED This error is usually related to driver issues. It suggests that a system thread generated an exception that the error handler did not catch. To fix it:
- Update or rollback the problematic driver.
- Use the Windows Memory Diagnostic tool to check for memory problems.
IRQL_NOT_LESS_OR_EQUAL This error occurs when a process or driver attempts to access a higher IRQL than what is permitted. The steps to fix it include:
- Update system drivers, especially network drivers.
- Run a memory check.
- Remove any recent hardware or software changes.
VIDEO_TDR_TIMEOUT_DETECTED This Stop Code is related to the Timeout Detection and Recovery (TDR) feature in Windows. It happens when the Graphics Processing Unit (GPU) does not respond within the permitted time. To address this:
- Update your graphics card drivers.
- Check the temperature of your GPU and ensure it’s not overheating.
- Reduce the graphics workload if overclocking.
PAGE_FAULT_IN_NONPAGED_AREA This error suggests that the system requested data that was not found in memory. This could be due to faulty RAM or a corrupt driver. To resolve this issue:
- Run the Windows Memory Diagnostic tool.
- Check the hard drive for errors (chkdsk /f /r).
chkdsk /f /r- Ensure all hardware components are properly seated.
SYSTEM_SERVICE_EXCEPTION This Stop Code can be caused by an exception that occurred during the execution of a system service. To fix this error:
- Update drivers that might be causing the issue.
- Run a system file check.
- Perform a virus scan to rule out malware.
DPC_WATCHDOG_VIOLATION This indicates a delayed procedure call (DPC) watchdog violation. It’s often related to incompatible drivers or firmware. To resolve it:
- Check for firmware and driver updates.
- Use the chkdsk command to check the disk for errors.
- Consider resetting or refreshing Windows if the problem persists.
NTFS_FILE_SYSTEM This error means there’s a problem with the NTFS file system. It could be due to a corrupted hard drive or bad sectors. To address this:
- Use the chkdsk command to repair the NTFS file system.
- If chkdsk finds no issues, run the System File Checker.
- Consider running Disk Cleanup to remove unnecessary files.
DATA_BUS_ERROR This is a generic hardware error that indicates a problem with the computer’s memory or the motherboard’s data bus. To troubleshoot this:
- Test your computer’s RAM.
- Check for overheating components.
- Inspect the motherboard for damaged capacitors or other issues.
Remember, these are general guidelines. The specific steps for resolving each issue may vary based on the individual circumstances of your system. Always back up your data before attempting any fixes, and consider seeking professional help if you’re not comfortable performing these tasks.
How Can We Resolve the Blue Screen of Death Issue?
To resolve a blue screen error, numerous solutions exist. However, you only need to follow a single, straightforward procedure to diagnose and fix the problem.
Here’s a guide to fixing a blue screen error:
1. Turn Off the Affected PC
Depress and maintain pressure on the power button until the system completely turns off. This action is permissible as the primary purpose of a proper shutdown is to secure all temporary data. However, in the event of a system crash, that opportunity is lost — compelling a shutdown is the sole remaining option.
2. Unplug Unnecessary USB Devices
Disconnect any peripheral equipment such as external hard drives and printing units. These external components and their associated software drivers could potentially be triggering the malfunction.
3. Start in Safe Mode with Internet
Safe Mode operates as a stripped-down iteration of your usual Windows environment, permitting only the crucial system processes. These fundamental operations are designed to minimize the risk of instigating further system crashes, thus providing you with an opportunity to diagnose and resolve the issue.
To initiate Safe Mode, power on your PC as usual. Upon reaching the Windows login interface, firmly press and maintain the Shift key, then navigate to the Power symbol and choose Restart.
Once your computer restarts, you’ll encounter the ‘Choose an option’ display. Navigate through the following sequence: Troubleshoot, then Advanced options, followed by Startup Settings, and finally, select the Restart option.
4. Remove Recently Installed Software
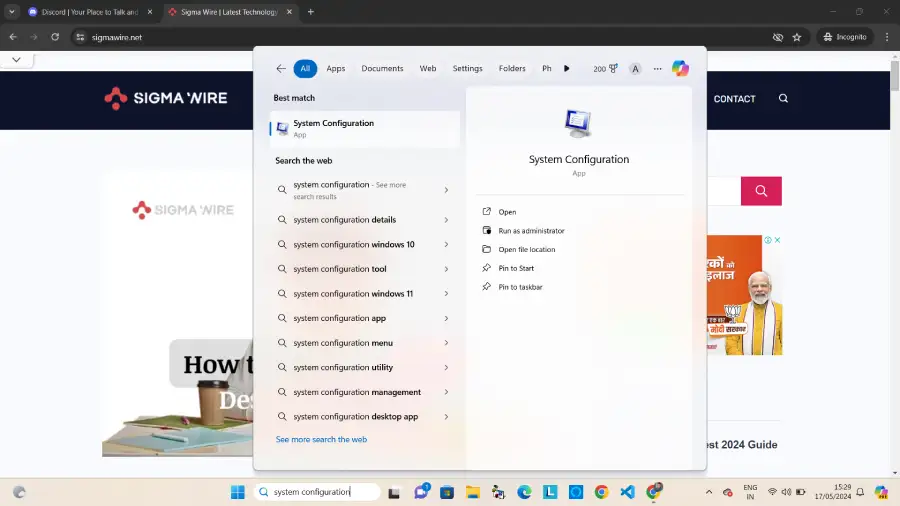
With your system now operating in Safe Mode, the immediate step is to eliminate any software additions made recently, as they often cause such issues. For software removal in Windows, initiate the process by hitting the Windows key. Enter ‘add or remove programs’ in the search bar and select the corresponding option to proceed.
- Power Off: Press and hold the power button until your computer shuts down. Even though a proper shutdown is ideal, it’s too late if the system has crashed.
- Disconnect Peripherals: Remove external devices like hard drives and printers. These peripherals and their drivers might be causing the error.
- Safe Mode: Boot into Safe Mode, which allows essential processes to run without triggering another BSOD.
- How to Enter Safe Mode:
- Start your PC normally.
- At the Windows sign-in screen, press and hold the Shift key.
- Select “Restart” from the Power icon.
- Choose an Option: After the restart, you’ll see the “Choose an option” screen.
- Select Safe Mode: Navigate to Troubleshoot > Advanced options > Startup Settings > Restart.
- Safe Mode with Networking: Upon restart, choose F5 to start in Safe Mode with Networking.
- Software Troubleshooting: In Safe Mode, uninstall recently installed software (except Microsoft-related programs) to identify the culprit.
- Uninstall Programs:
- Press the Windows key.
- Type “add or remove programs” and click the corresponding option.
- Scroll through the list, identify suspect software, and click “Uninstall.”

In the process, it’s advisable to conduct a sweep with a junkware removal utility to expunge unnecessary files and PUPs (potentially unwanted programs) that may be hampering your system’s performance. Clearing out these digital cobwebs not only liberates storage space but also ensures your computer operates efficiently after resolving the blue screen issue
5. Resolve Driver Issues
Considering that freshly updated drivers might be at fault, it’s prudent to revert any recent driver modifications. Prioritize the rollback of display adapter drivers and secondary components first, as they are often the root of such conflicts
Begin by tapping the Windows Key, enter ‘Device Manager’ into the search field, and confirm with the Enter key.
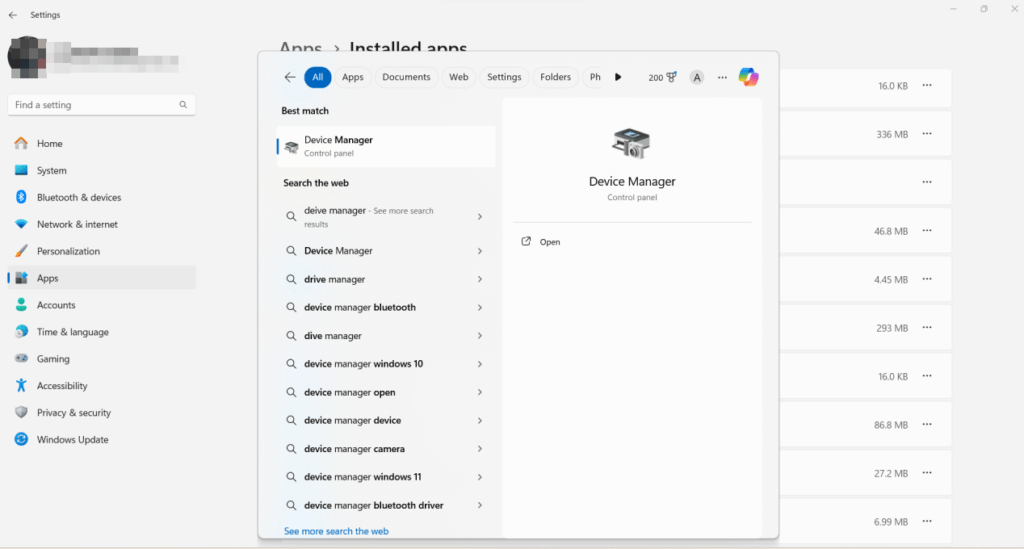
Next, navigate the array of components, perform a right-click on the desired item, and select ‘Properties’ from the ensuing menu.
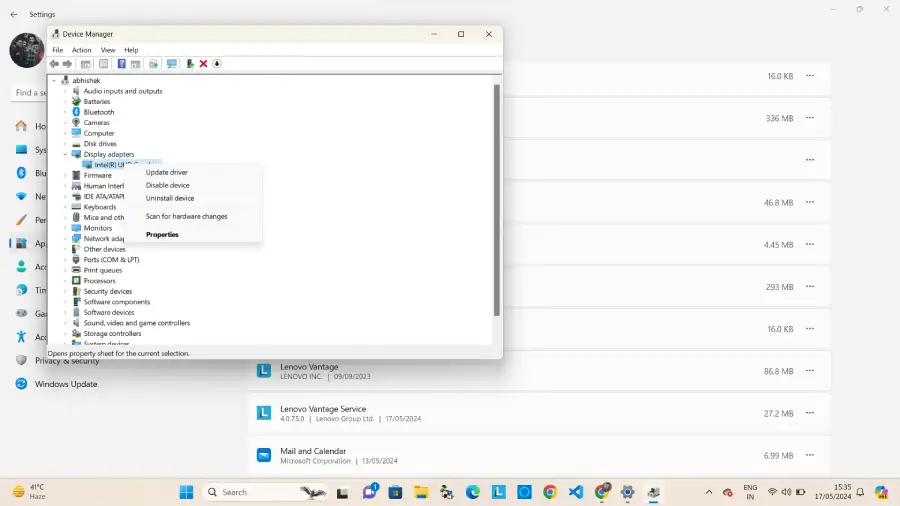
To complete the process, select the ‘Device’ tab and then choose the ‘Roll Back Driver’ option.
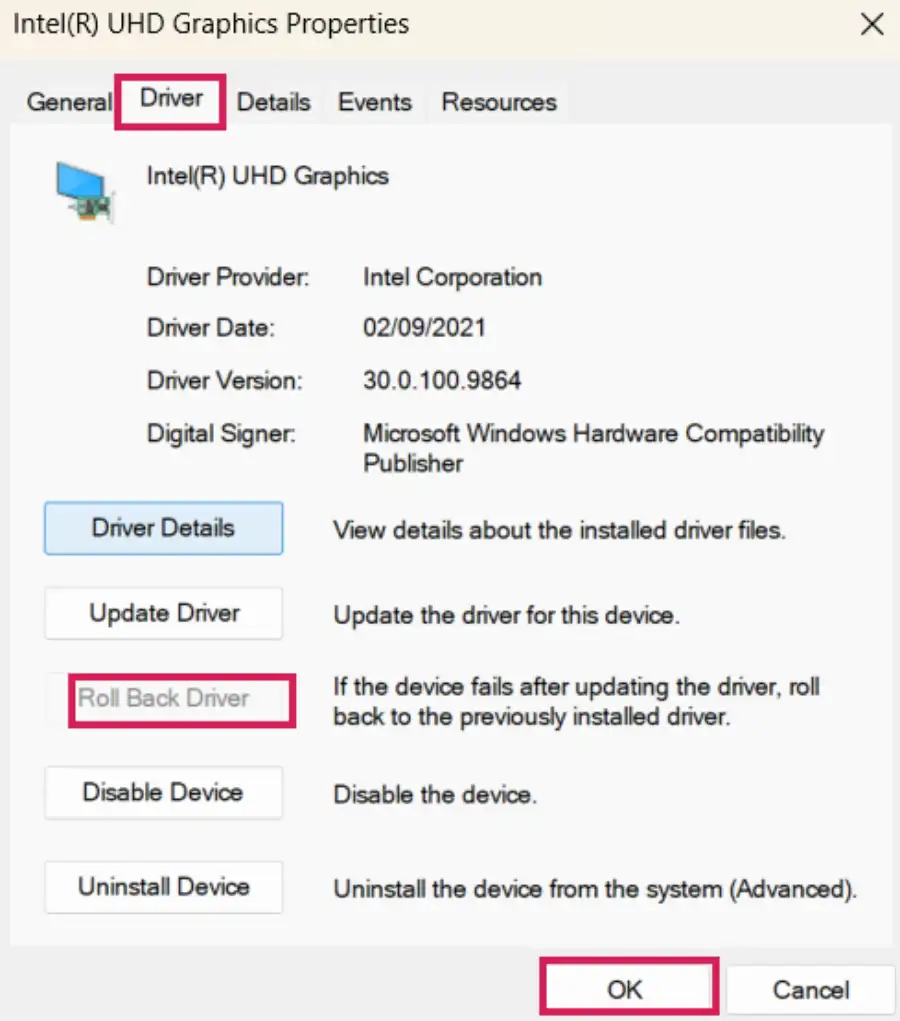
Repeat this procedure to revert updates for additional hardware elements that have been recently upgraded
6. Scan for Malicious Software
Malware can compromise your computer’s performance and security by damaging or corrupting essential files. To safeguard your system and prevent potential issues, it’s crucial to use a reliable malware removal tool. Ensure that your security software is up-to-date, and perform a comprehensive scan to detect and eliminate any hidden malware threats on your device.
Enhance your device’s security by downloading Avast One. This powerful tool conducts a meticulous scan to safeguard against any malware threats.
7. Execute a System File Check (SFC) for Integrity
To ensure the integrity of your system files, initiate a scan with the System File Checker (SFC). This utility will meticulously search for any damaged or missing files and attempt to repair or restore them. To perform an SFC scan, simply access the Command Prompt and execute the process.
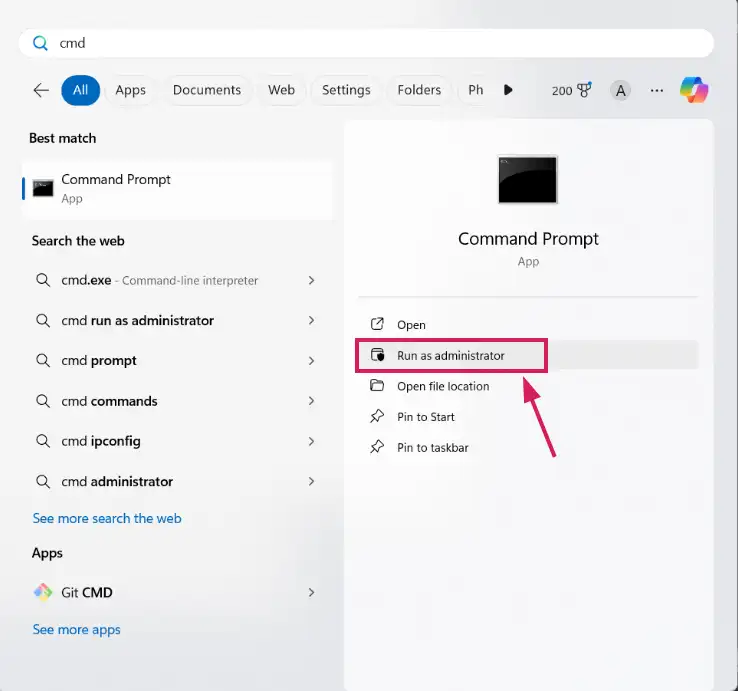
To launch the Command Prompt with administrative privileges, begin by pressing the Windows key and searching for ‘cmd’. Then, right-click on the Command Prompt result and choose ‘Run as Administrator’. Confirm any subsequent prompts to proceed with elevated permissions.

Next, input sfc /scannow into the Command Prompt window, press Enter, and allow the system to conduct the scan to completion.
8. Conduct a Comprehensive Hard Drive Analysis
Utilize the CHKDSK utility to diagnose and repair hard drive issues. It meticulously scans for file system irregularities and physical disk damage, which are often at the root of system instability.

To initiate a CHKDSK scan, activate the Windows search by pressing the Windows key, then type ‘cmd’. In the search results, right-click on ‘Command Prompt’ and select ‘Run as Administrator’. If any confirmation prompts appear, click ‘Yes’ or ‘OK’ to proceed with administrative rights.
Proceed by entering chkdsk into the Command Prompt and pressing Enter. This command will begin the scan, checking your hard drive for errors and repairing them as needed.

Should the scan reveal any drive errors, initiate a more thorough repair by typing chkdsk /r into the Command Prompt and pressing Enter. This command triggers an in-depth scan that repairs and recovers damaged sectors, ensuring they function correctly within the file system.
As hardware components naturally wear down over time, it’s crucial to conduct regular hard drive tests, especially if your disk has been in use for several years. These proactive diagnostics can help you identify and address potential problems early, preventing unexpected system failures.
9. Inspect Your Computer’s RAM
Encountering system instability can often be attributed to RAM issues. To pinpoint the exact problem, the Windows Memory Diagnostic tool is your go-to solution. This built-in utility scans your memory to detect any faults that may be affecting your computer’s performance.
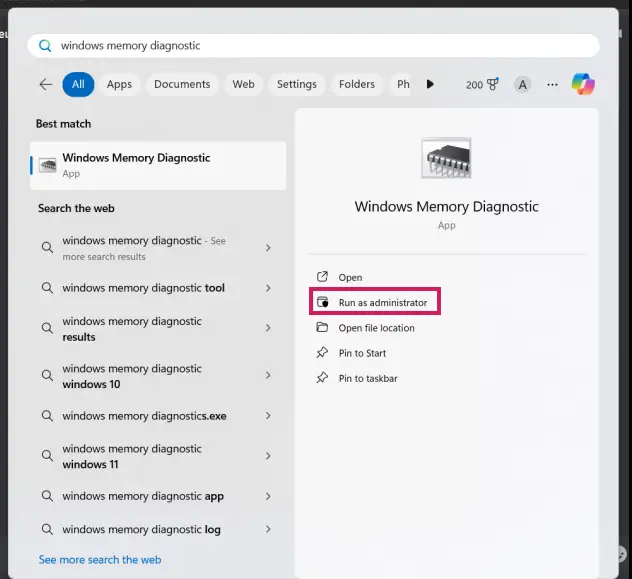
To verify the proper operation of your computer’s RAM, simply press the Windows key, input “Windows Memory Diagnostic” into the search bar, and hit Enter.
When ready, select Restart now and check for problems (recommended) to initiate the process.
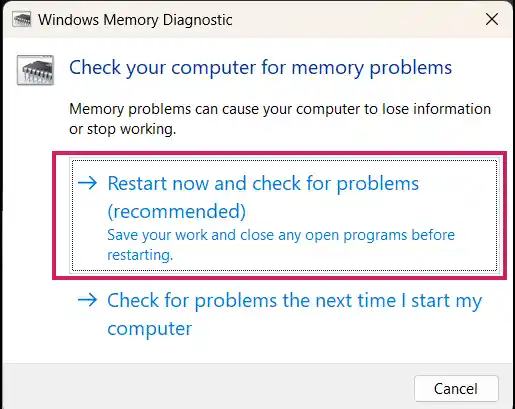
Upon reboot, the diagnostic results will be displayed. For future reference, these can be accessed in the Event Viewer.
10. Reboot Your Computer to Verify Stability
Restarting your computer is necessary to check the RAM, and it’s an opportune moment to determine if the previous remedies have been effective. If system crashes have ceased, your issue is likely resolved.
You may now cautiously reintroduce software and drivers that were earlier uninstalled or downgraded. Ensure you download them from verified sources and install them sequentially, without other concurrent installations. Prioritize updating Windows drivers, followed by audio and graphics drivers.
For maintaining up-to-date drivers and optimal system performance, consider using a driver updater tool. This not only spares you the manual update process but also helps to reduce installation-related issues with new versions. Additionally, regular PC maintenance and antivirus software installation are key to safeguarding your system, files, and overall security.
11. Final Step: Reinstall Windows for a Fresh Start
If all attempts have been unsuccessful, the remaining solution is to reinstall Windows. This action will erase all data on your computer, making it a last resort. However, if you can operate Windows in Safe Mode, you have the opportunity to clone your hard drive and back up your data before proceeding with the deletion of Windows and the installation of a fresh OS version.
Stop Crashes and Make Your PC Faster
Tired of encountering the dreaded blue screen of death? Fear not! Avast Cleanup is your trusty companion for maintaining a healthy and efficient PC. Here’s how it works:
- Junk Removal: Avast Cleanup sweeps away unnecessary files, freeing up valuable disk space. Say goodbye to clutter and hello to speed!
- Disk Optimization: Our defragmentation wizard organizes your hard drive, ensuring lightning-fast access to your data. No more waiting around!
- Error Fixing: Avast Cleanup detects and repairs disk errors, preventing potential crashes. It’s like having a personal mechanic for your PC.
- Software Updates: Outdated software can lead to compatibility issues. Avast Cleanup keeps your programs up-to-date, minimizing the risk of blue screen mishaps.
